Setting up your guide page on All my tours: the complete walkthrough
Short answer
Setting up on All my tours takes about twenty minutes: sign up with your email, fill in the profile (photo, city, about you, languages), add your first tour, set your weekly hours, then share your link. Everything else — calendar sync, reviews, add-ons — is optional and can wait until you've taken a booking or two.
Who this is for: Guides setting up their All my tours page for the first time, and anyone looking up a specific setting later.
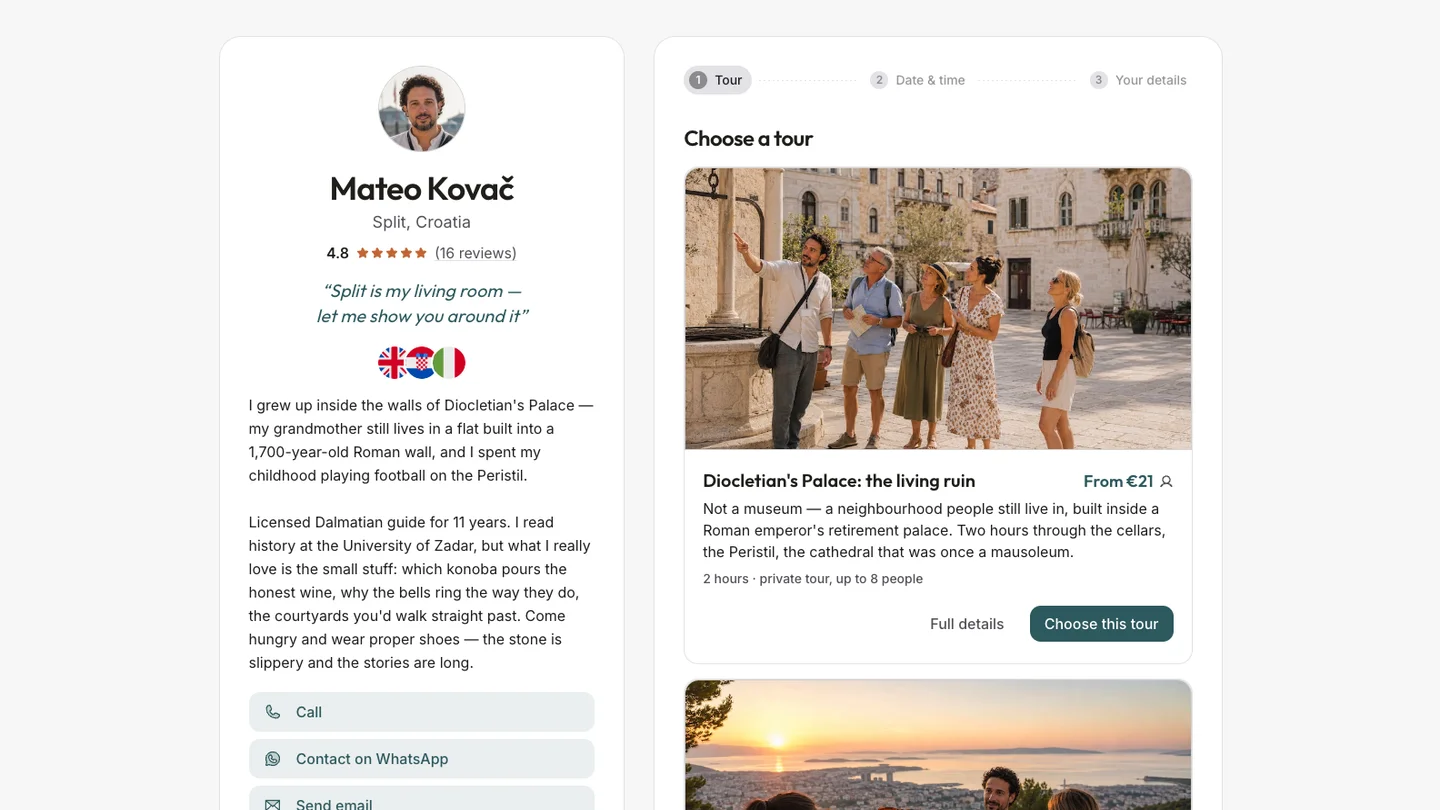
I've now watched a few hundred guides set up their page, and I can tell you exactly where people get stuck. It's almost never the hard-sounding stuff — calendar sync takes one click and nobody has ever emailed me about it. It's the small forks in the road: private or public group? per person or flat? do I need a minimum? why isn't my tour showing up?
So this is the article I wish I could have handed to everyone. Read it start to finish the first time (it's shaped like the actual setup order), then use it as a lookup later. If you only have twenty minutes, do the five things in the checklist and skip the rest — the page works fine half-configured, and the parts you ignore stay quietly out of your way.
One thing to get out of the way first, because it's the most common question: All my tours doesn't touch your money. It handles the booking — availability, confirmation, reminder emails, your calendar — and then gets out of the way. Cash on the day, bank transfer, a payment link you send yourself: entirely your business. No commission, no percentage, nobody standing between you and the traveller.
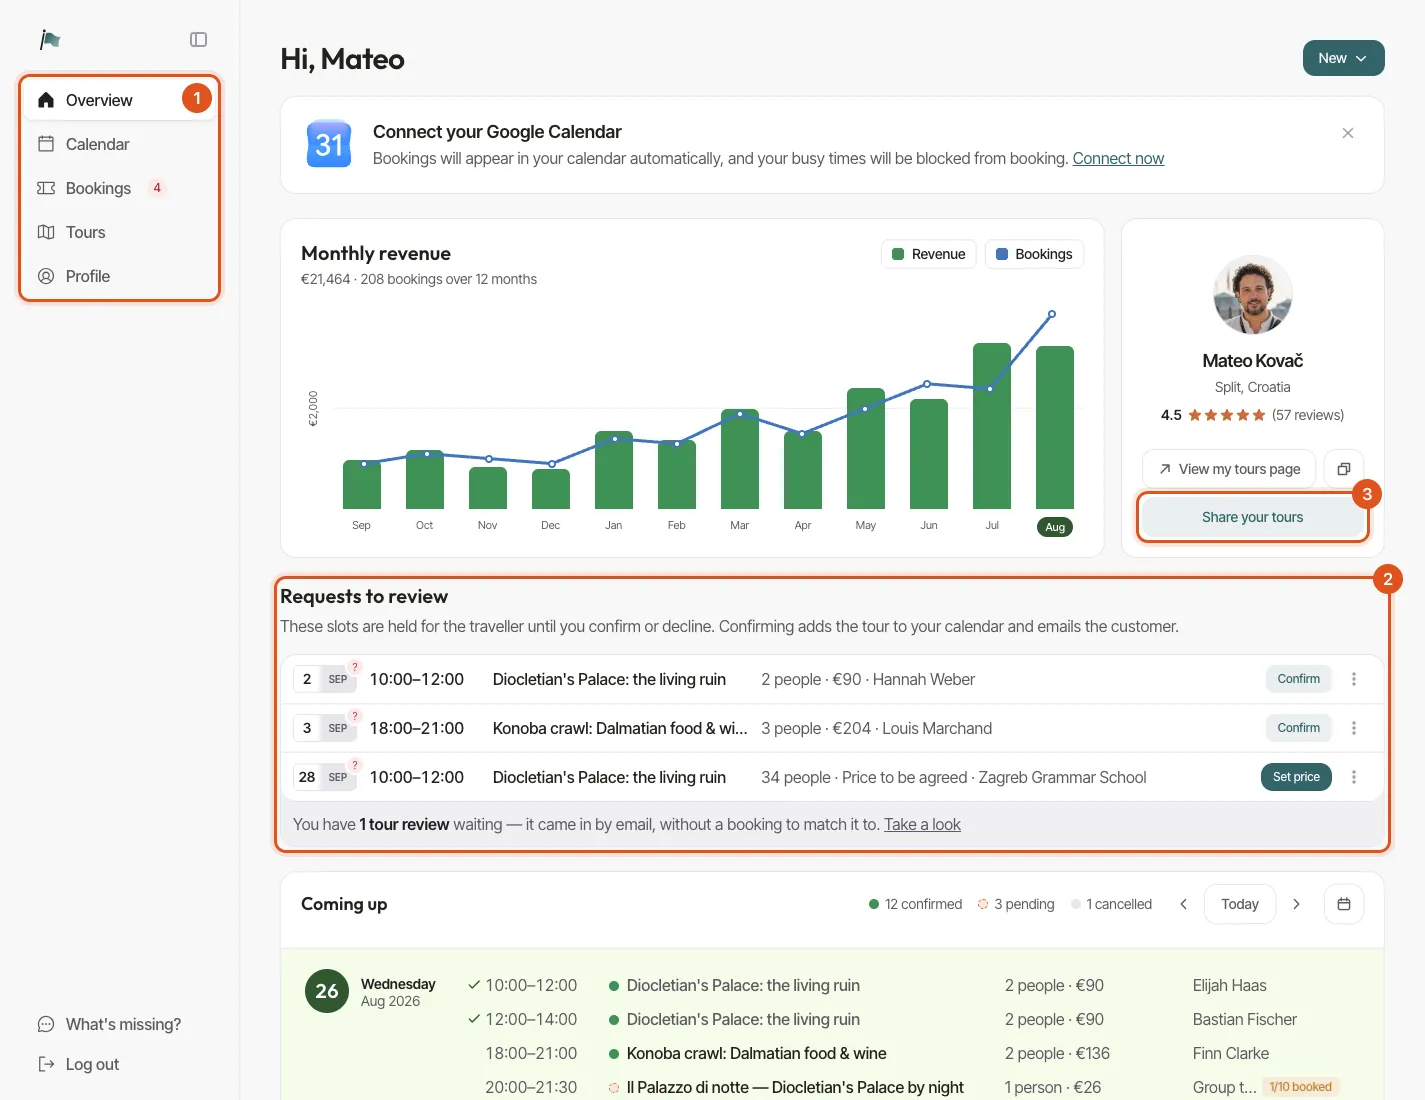
The twenty-minute version
If you do nothing else, do this:
- Sign up — name, city, email. No password to invent or forget.
- Profile — photo, city and country, a few sentences about you, your languages.
- One tour — title, price, duration, meeting point.
- Your weekly hours — Calendar → Availability.
- Copy your link and put it in your Instagram bio.
That's a page a traveller can book. Everything below is refinement.
Signing up
Go to the signup page and give three things: your name, the city you guide in, and your email address.
There's no password. We email you a link, you click it, you're in — and that same first link doubles as the confirmation that the address is really yours. Every later login works the same way: type your email, get a link, click it. It sounds odd for about a week and then you realise you haven't reset a password since.
Two things happen quietly on signup that are worth knowing about:
- You get a page address derived from your name — something like
allmytours.com/marta-puig. You can change it, see below. - You get default availability: Monday to Saturday, 10:00–18:00, the hours travellers are offered when they try to book you. That's a guess, not a recommendation. Fix it when you get to the Calendar.
You may also notice a small "Search indexing — pending a quick manual review" note on your Profile. Don't panic: your page is live and taking bookings from the second you create it. That note only means we haven't yet flipped the switch that invites Google to index it. It's a spam measure, it's usually done within a day, and it changes nothing you can see.
The Profile page
This is your Profile page, and it's the whole of what a traveller learns about you — as opposed to your tours. Work down it in order.
A general note on this screen: nothing saves until you press "Save changes" at the top right. If you wander off mid-edit, the app will stop you and ask. This is deliberate — a profile that autosaved would publish your half-written bio to the internet at the exact moment your phone rang.
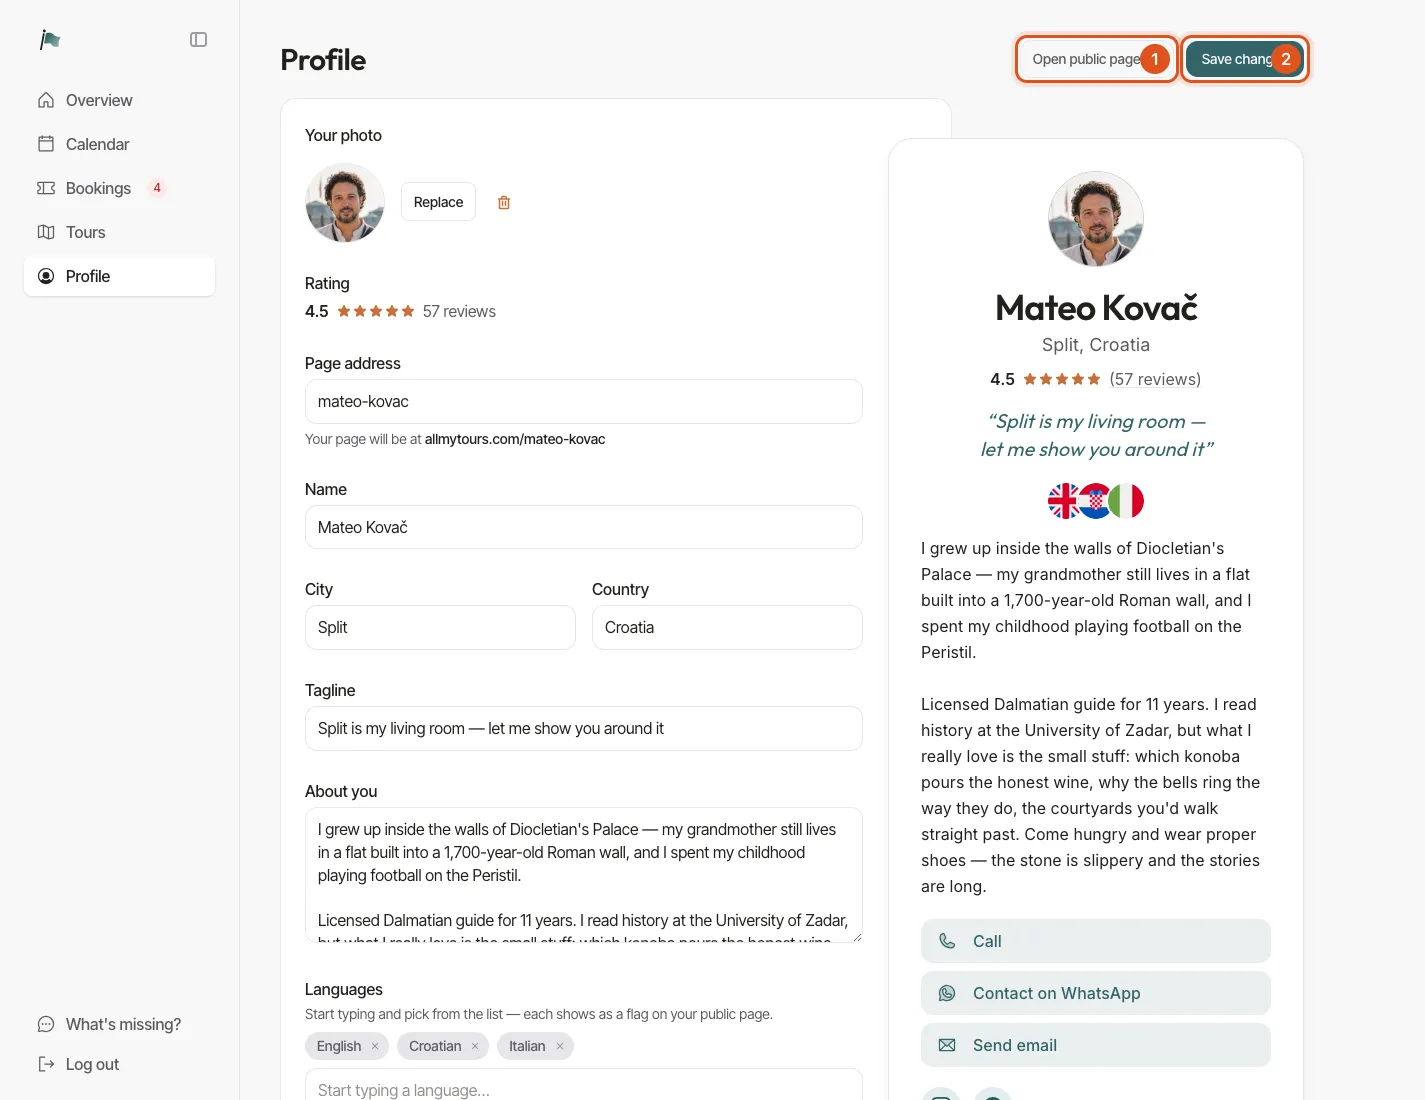
Your photo
A real photo of your actual face. Not your city, not your logo, not you at 400 metres wearing sunglasses on a mountain. Travellers are choosing a person to spend three hours with; the photo is doing more work than any sentence you write.
Upload up to 8MB — JPEG, PNG, WebP or GIF. It gets re-encoded and optimised on the way in, so a straight-from-the-phone photo is fine.
Page address
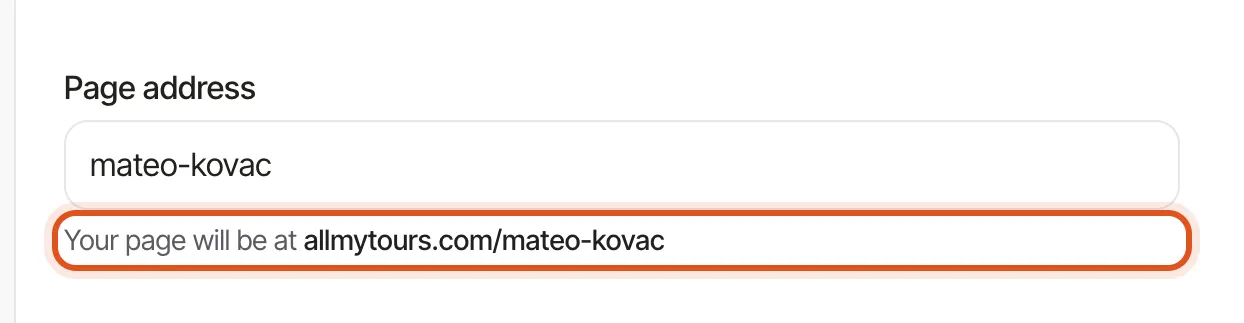
Your public URL. It lives at the root of the domain — allmytours.com/marta-puig, not /guides/marta-puig or /p/12345 — which makes it short enough to say out loud and to print on a card.
You can change it whenever you like, and this is the part people worry about needlessly: your old address keeps working forever. It redirects to the new one, so cards you've already handed out and links in old Instagram posts don't break. Your old address is also permanently reserved to you, so no stranger can pick it up and inherit your traffic.
A few addresses are off-limits because they'd collide with the site's own pages (login, admin, guides, and so on). If you pick one of those you'll get a polite "that's reserved — pick another." Letters, numbers and hyphens, 2–40 characters.
Name, city, country, tagline
The tagline is one line under your name — the thing that makes someone read the next paragraph. "Stories the guidebooks skip" beats "Professional licensed tour guide since 2014," which is on approximately every guide page ever made. It's optional, but it's cheap.
About you
Five lines is plenty. Who you are, how long you've been guiding, and what makes your tours yours. Resist the urge to list credentials — put those in one sentence at the end and spend the rest on the reason someone would want you specifically.
Languages
Start typing, pick from the list. Each one shows as a little flag on your public page.
Do this before you build tours, because languages cascade: a public group tour runs in exactly one language (everyone's on the same walk, so it has to), and a private tour offers travellers a choice from this list. If you add a language here later, every private tour you haven't deliberately narrowed automatically widens to include it. Nice when you're ready to start guiding in Italian; slightly surprising if you weren't expecting it.
Phone, WhatsApp, email
Here's the bit people set up wrong, so read carefully: your contact details are private by default, and each one is a separate opt-in.
- Typing a phone number does not publish it. It stays private until you tick "Show a Call button on my public page."
- WhatsApp is its own tick, because a number being reachable on WhatsApp is a fact only you know. Tick it and travellers get a "Contact on WhatsApp" button that opens a chat.
- The contact email is separate from your login email on purpose. Log in with your private address; show travellers a public one. Leave it blank and it falls back to your login address — but again, only if you tick "show it."
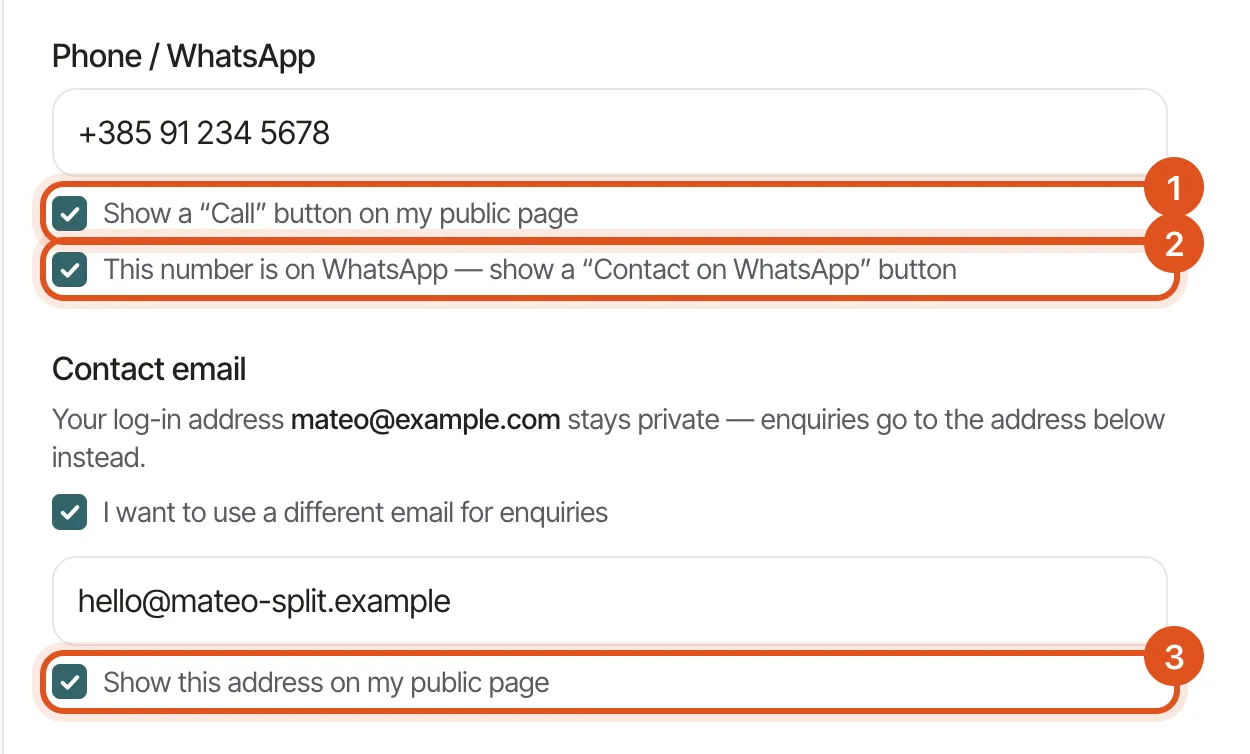
Nothing here is required. A page with no visible phone number and no email works perfectly well; travellers book through the form, and replies to booking emails reach you anyway (see Emails).
Social links
Paste any link — Instagram, Facebook, TikTok, your own site. Don't bother telling us which is which; we work it out from the URL and draw the right icon. One per line.
Timezone, currency, week start, time format
The dull, load-bearing settings.
Timezone is the important one. Every time in the app — every slot, every departure, every reminder — is in your local time. Set this wrong and everything is subtly, infuriatingly off. It's detected from your browser at signup, so it's usually already right; check it anyway.
Currency is per-guide, and it's what every price on your page is written in.
Week starts on and Time format are cosmetic and affect only what you see in the admin — Monday or Sunday first, 13:00 or 1:00 PM. Times are always stored the same way underneath, so switching later doesn't move anything.
Plan & billing
Right now we're in early access, which means: free, unlimited bookings, for everyone, while we work out what a fair price actually looks like. Your Profile will show "Early access" and a note to that effect.
For completeness, the plans underneath are: Free (5 confirmed bookings in total, a one-time trial), Standard (8 confirmed bookings per calendar month), Unlimited (no cap). Every feature is identical on every plan — plans only govern how many bookings you can confirm. Nothing is degraded, nothing is locked behind a tier, and there is no "upgrade to remove our branding" nonsense.
Booking status: pausing
Bottom of the Profile. Pause bookings does exactly one thing: stops new bookings. Your page stays online with a clear notice, and every booking you've already taken is untouched — you manage them exactly as before. For a holiday, a broken ankle, or the fortnight in February when you'd rather not.
If you're only away for a few days, don't use this — block the dates in the Calendar instead (see Days off). Pausing is the master switch; days off are the scalpel.
The setup checklist
On your Overview you'll find a six-step checklist: your name, profile photo, city & country, about you, languages, first tour. Six ticks and you have a page worth sending someone.
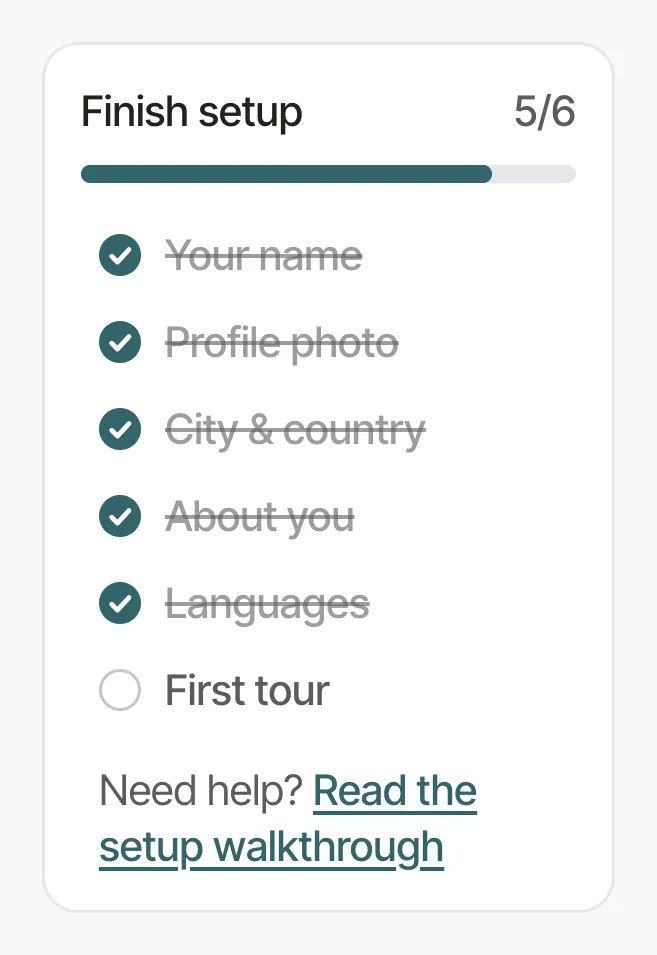
It checks presence, not quality — a one-word bio ticks the box. That's on purpose; a checklist that argued with you about your own writing would be insufferable. When you finish it, it shows a little "you're done" state and waits for you to close it, rather than vanishing and leaving you wondering whether it ever existed.
Building a tour
Tours → New tour. The editor has three tabs, and the honest truth is that you only need the first one.
Tab 1 — Information
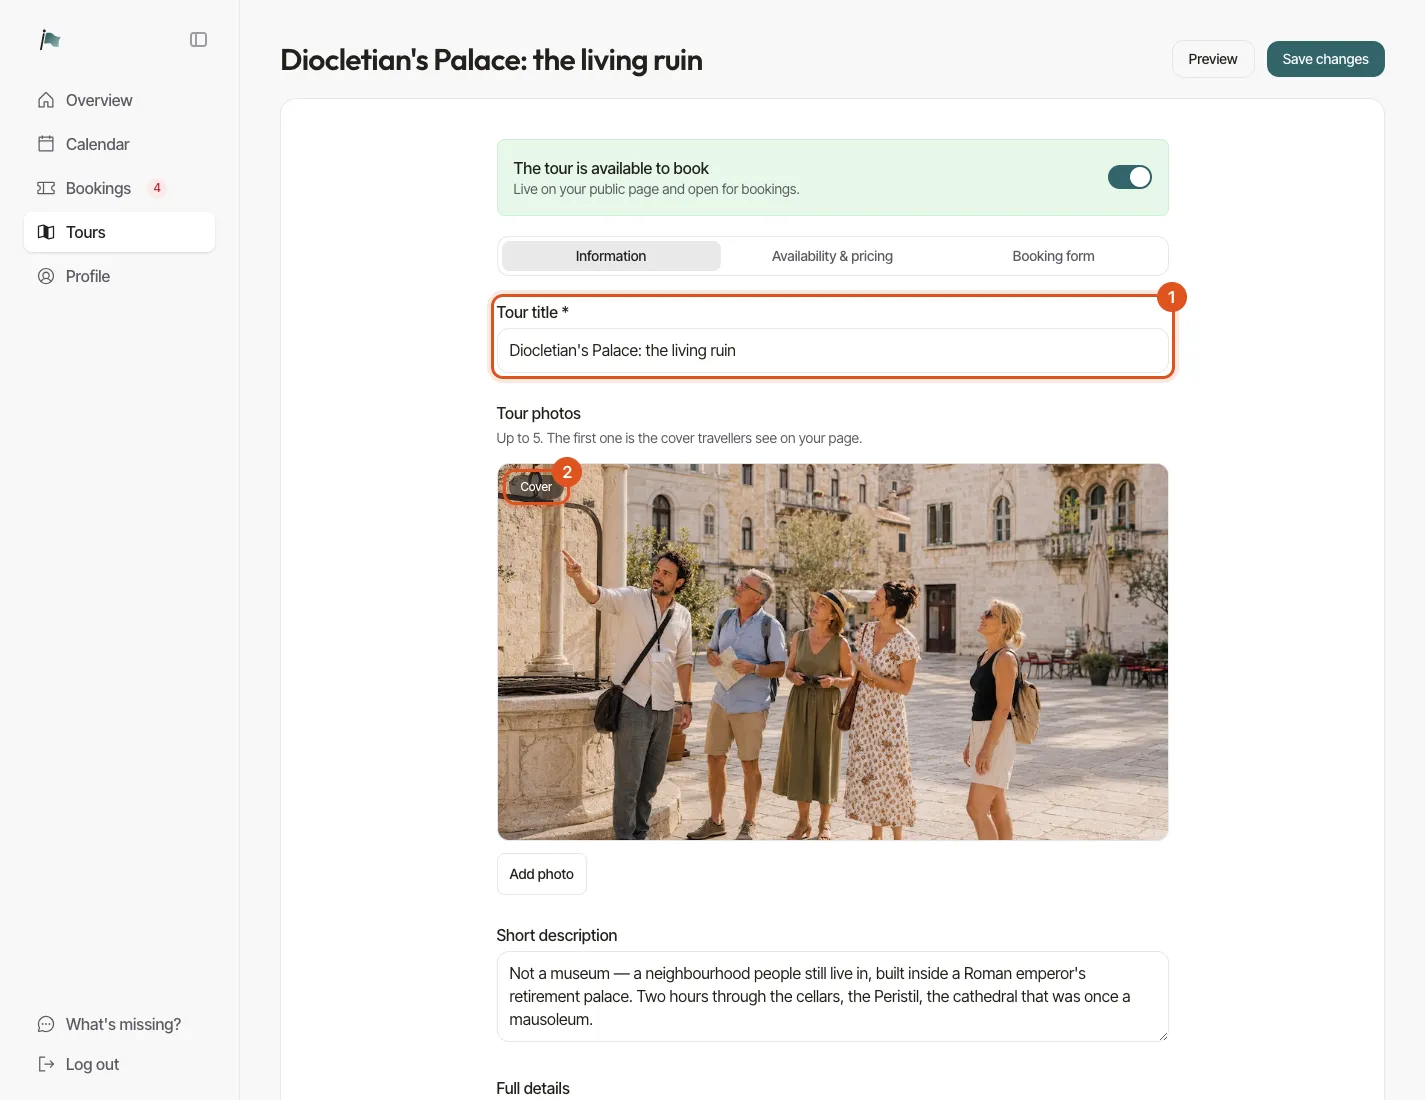
Tour title is the only required field on the whole form. Make it descriptive rather than clever: "Gothic Quarter walking tour" gets found; "Whispers of Stone" does not.
Photos — up to five. The first one is your cover and it's what shows on cards, your page, and the link preview when someone shares you on WhatsApp. Choose it deliberately.
Short description is one or two lines, shown on the tour card. This is the sentence that decides whether someone taps.
Full details is the long-form version on the tour's own page: the itinerary, what's included, what to bring, how to find you, your cancellation terms. Line breaks are kept, and you get three bits of formatting — **bold**, *italic*, and [link text](https://…). That's all, and it's on purpose: three marks you can remember beat a formatting toolbar you have to learn.
Duration in minutes, and max people — the largest group you'll take. Max people also decides when a departure shows as full.
Meeting point is two fields, which trips people up:
- The address field has autosuggest. Pick a suggestion and you get a real pin plus a small map on the tour page. This is the one travellers navigate with.
- Additional instructions is the human bit — "look for the guide with a red umbrella," "we meet by the side entrance, not the main steps." Optional, and worth more than you'd think for cutting down the pre-tour texts.
You can fill in one, both, or neither. A tour with no address just doesn't show a map.
Tab 2 — Availability & pricing
This is where the forks are.
Private or public group?

Private — the traveller requests one of your free slots and you approve it. One booking per slot; nobody else joins them. Slots are generated from your weekly availability minus anything already on your calendar.
Public group — a fixed departure that strangers join together. Bookings confirm instantly, no approval from you. Priced per person, and typically several bookings on one departure.
Pick by asking whether two unrelated strangers should end up on the same walk. If yes, public. If your tour is a bespoke thing for one family at a time, private.
You can have both kinds side by side, and most guides eventually do.
Email me about booking activity
On by default. Covers someone joining a group departure and a traveller cancelling their own booking. Turn it off for a high-traffic tour where you'd rather just check the Bookings list once a day.
Note what it doesn't cover: a new private-tour request always emails you, whatever this says, because that one is waiting on your approval and silently sitting there would be a disaster.
If you chose Public group
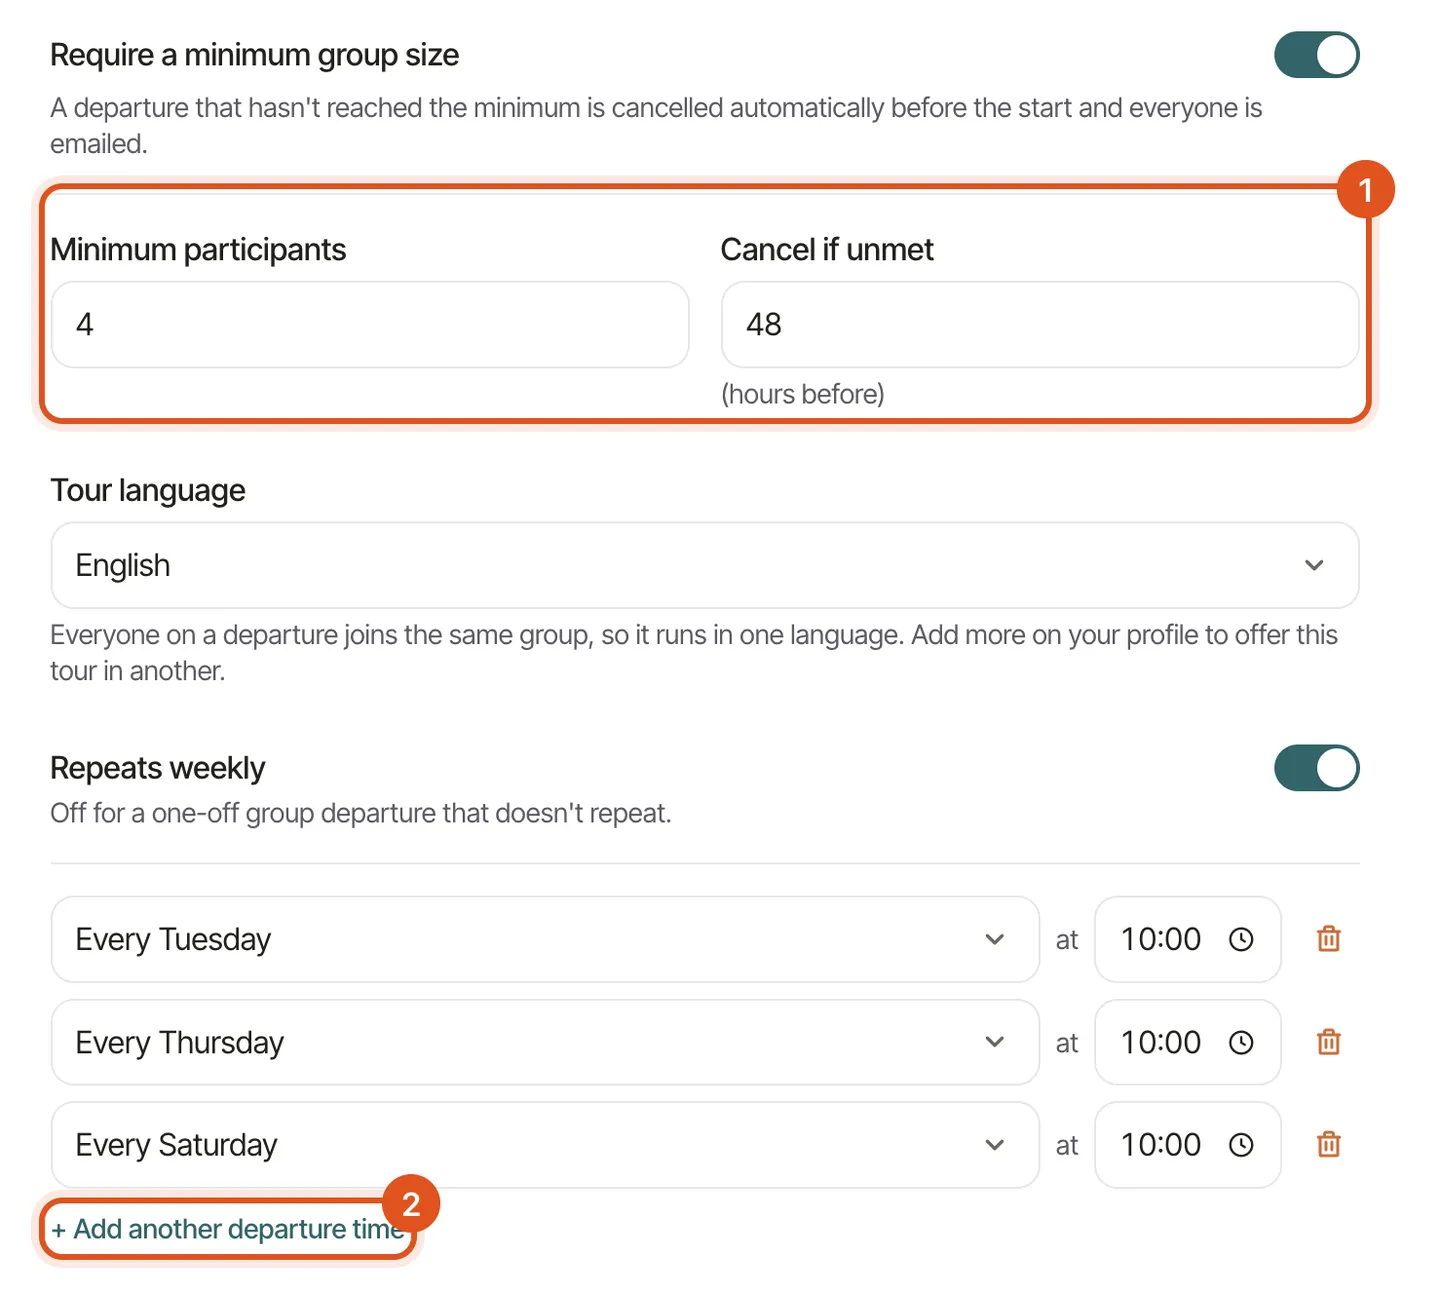
Require a minimum group size — off by default, meaning the tour runs even if one person books. Turn it on and you set two numbers: the minimum participants and cancel if unmet, N hours before (default 48). If a departure hasn't reached the minimum by that cutoff, it's cancelled automatically and everyone who booked is emailed. No 6am decision, no awkward message you have to compose.
If a departure is short by one and you'd rather run it anyway, you can. Open the departure and confirm it — that waives the minimum for that one departure only, stops the auto-cancel, and re-opens it to late joiners. It's one-way, because the moment you do it everyone is told the tour is definitely on.
Tour language — one language, chosen from your profile languages. Everyone on a departure shares a group, so it can't vary per person.
Repeats weekly — on by default. Add as many weekly departure times as you like: "Every Saturday at 10:00", "Every Saturday at 15:00", "Every Tuesday at 09:30". These generate departures indefinitely, and you never have to top them up.
Turn it off for a one-off group departure — a single date and time, checked live for conflicts as you type. After the tour exists, you add further one-off dates from Bookings → New → Departure, not from this form.
If you chose Private
Tour languages — starts as all your profile languages. Remove any you'd rather not run this particular tour in. The traveller picks one when they book.
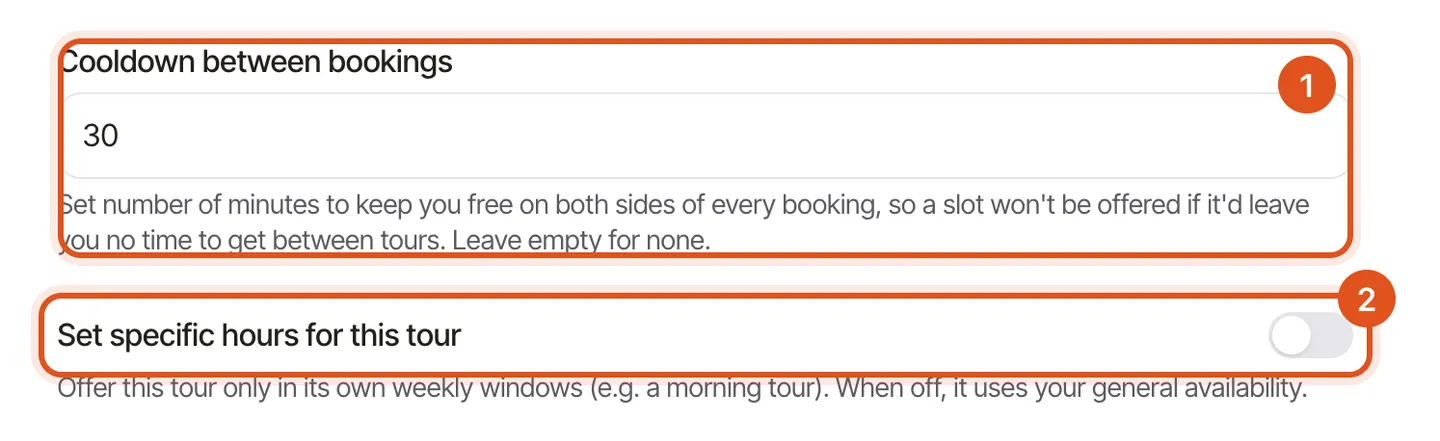
Cooldown between bookings — minutes kept free on both sides of every booking of this tour. If you need half an hour to cross town, put 30 here and the app will simply never offer a slot that would leave you sprinting.
Set specific hours for this tour — off by default, meaning the tour uses your general weekly availability. Turn it on for a tour that only makes sense at certain times: a sunrise walk offered Tue–Sat 06:00–09:00, say. It replaces your general hours for this tour rather than adding to them, so if you enable it you must enable at least one day, or the tour becomes unbookable. (The form tells you so.)
Pricing
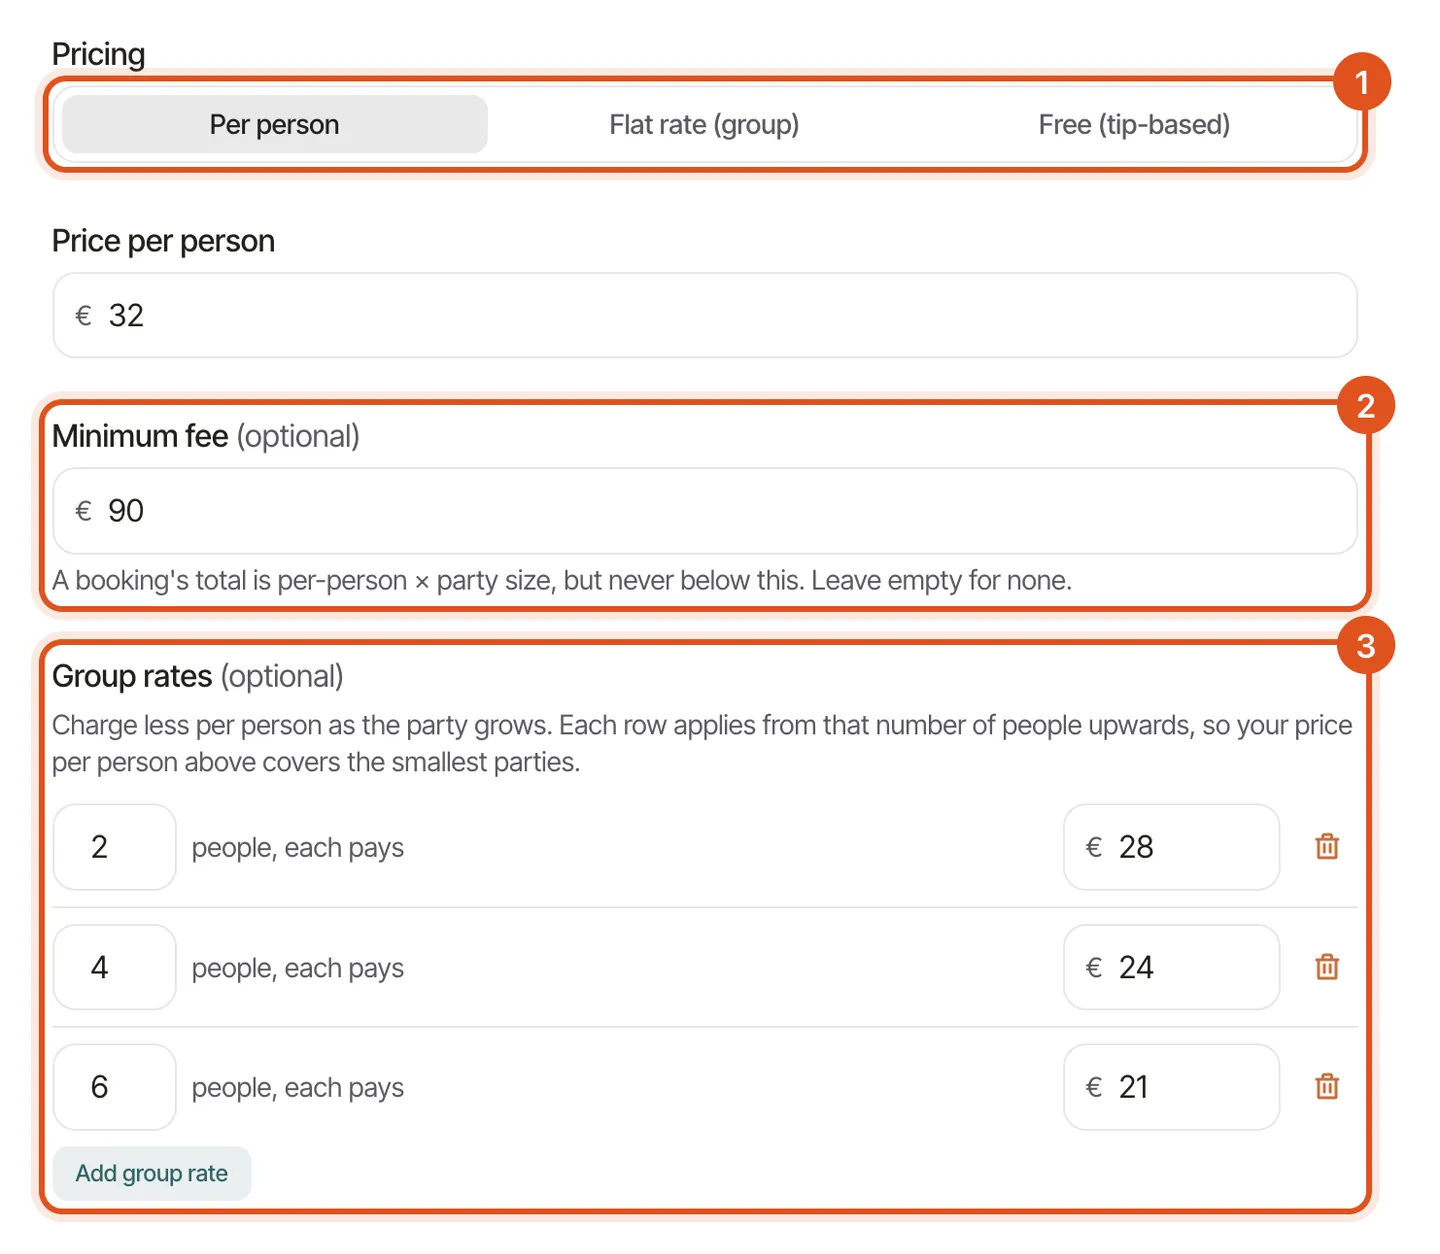
Three modes:
| Mode | What it means |
|---|---|
| Per person | Total is price × party size. The default. |
| Flat rate (group) | One price for the whole group, up to your max. Private tours only. |
| Free (tip-based) | No price at all. Travellers tip you directly at the end. |
Free tours are genuinely free, not "priced at zero" — there's nothing to charge, so add-ons disappear from the form. You can still add tiers, purely to see who's coming.
Minimum fee (per-person tours only) is the quietly clever one. Set price €35/person with a minimum fee of €140 and a couple booking for two pays €140, not €70. It's how you make small private groups viable without pricing out the larger ones.
Group rates are the same idea from the other end: the per-person price drops once a party reaches a size you choose. €32 each, then €28 each from four people, then €24 from six. Each row applies from that number of people upwards, so your base price is the one that covers the smallest parties.
Additional price tiers are extra quantity pickers alongside your base price — Kids €15, Seniors €25. The traveller picks how many of each; the total adds up correctly.
Add-ons are optional extras travellers tick at booking: airport pickup, a tasting, photos. Each is charged either per person or per booking — choose from the little dropdown next to the price. A €10 tasting per person on a group of four is €40; per booking it's €10.
One thing worth knowing: tiers and add-ons are frozen onto each booking at the price they were sold at. Raise your prices next spring and last autumn's bookings still show what the traveller actually agreed to pay. Your history never silently rewrites itself.
Tab 3 — Booking form
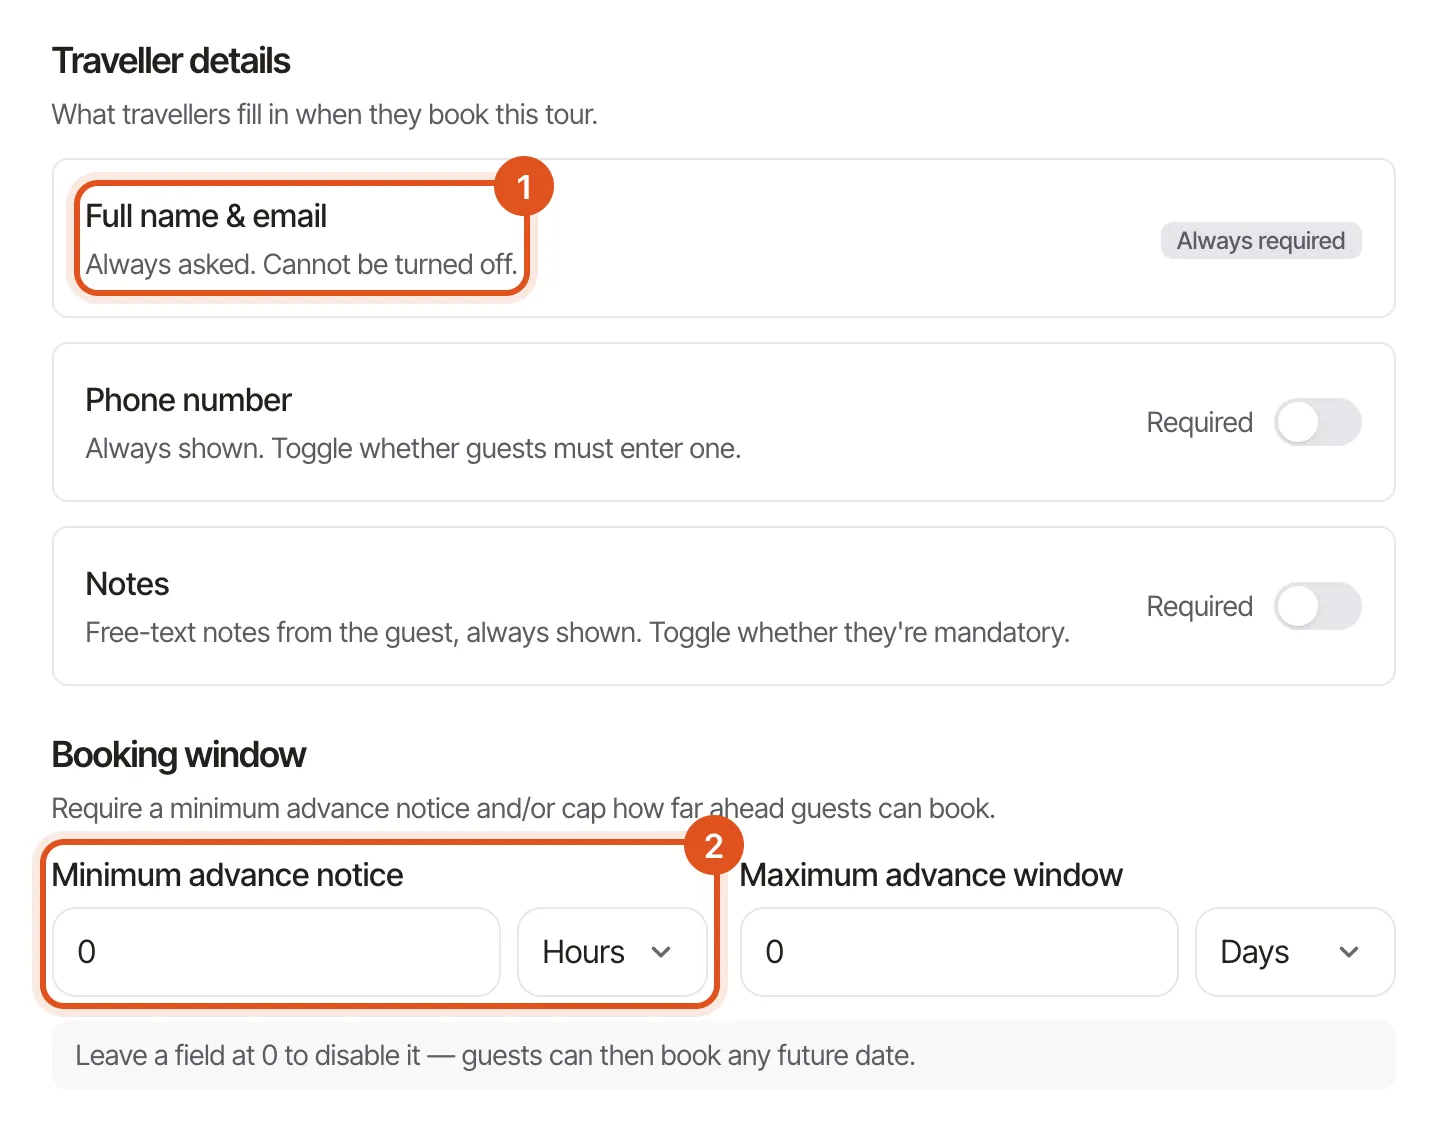
Traveller details — name and email are always required and can't be switched off. Phone and notes are always shown; these toggles decide whether they're mandatory. Making phone required is sensible for anything where you might need to find someone at the meeting point; making notes required is usually a mistake, since it forces people to type something when they have nothing to say.
Booking window — two limits, both off by default:
- Minimum notice: how close to the start someone may still book. "At least 12 hours" stops the 9:40 booking for a 10:00 tour.
- Maximum advance: how far ahead. "No more than 6 months" stops speculative bookings for a season you haven't planned.
Both are enforced when slots are generated and re-checked at the moment of booking, so there's no race where a slot goes stale in someone's browser. Your own admin views ignore them — you can always add a booking yourself, whenever.
Live, hidden, archived
Every tour is in one of three states:
- Live — on your public page, bookable.
- Hidden — off your public page, but still there for you. Use it while you're writing a tour, or for a seasonal one in the off-months. You can still add bookings to a hidden tour yourself.
- Archived — retired. Off the public page, out of your active list, but the tour and all of its history (bookings, reviews, revenue) is kept whole. Restorable at any time — it comes back Hidden, so you decide when it goes live again.
Deleting a tour is only possible when it has no history at all. Once a tour has bookings, archive is the retire path — because deleting it would take those bookings, and their reviews, and your revenue figures with it.
Availability: your weekly hours
Calendar → Availability (top right). Two tabs.
Every week
Seven rows, one per day, each with a toggle and a start/end time. This is your usual week and it repeats until you change it.
There is no Save button. Every change is kept as you make it — you'll see a quiet "Saved" appear. Toggling a day off keeps its times on screen, so switching it back on restores the hours it had rather than dumping you back on the default.
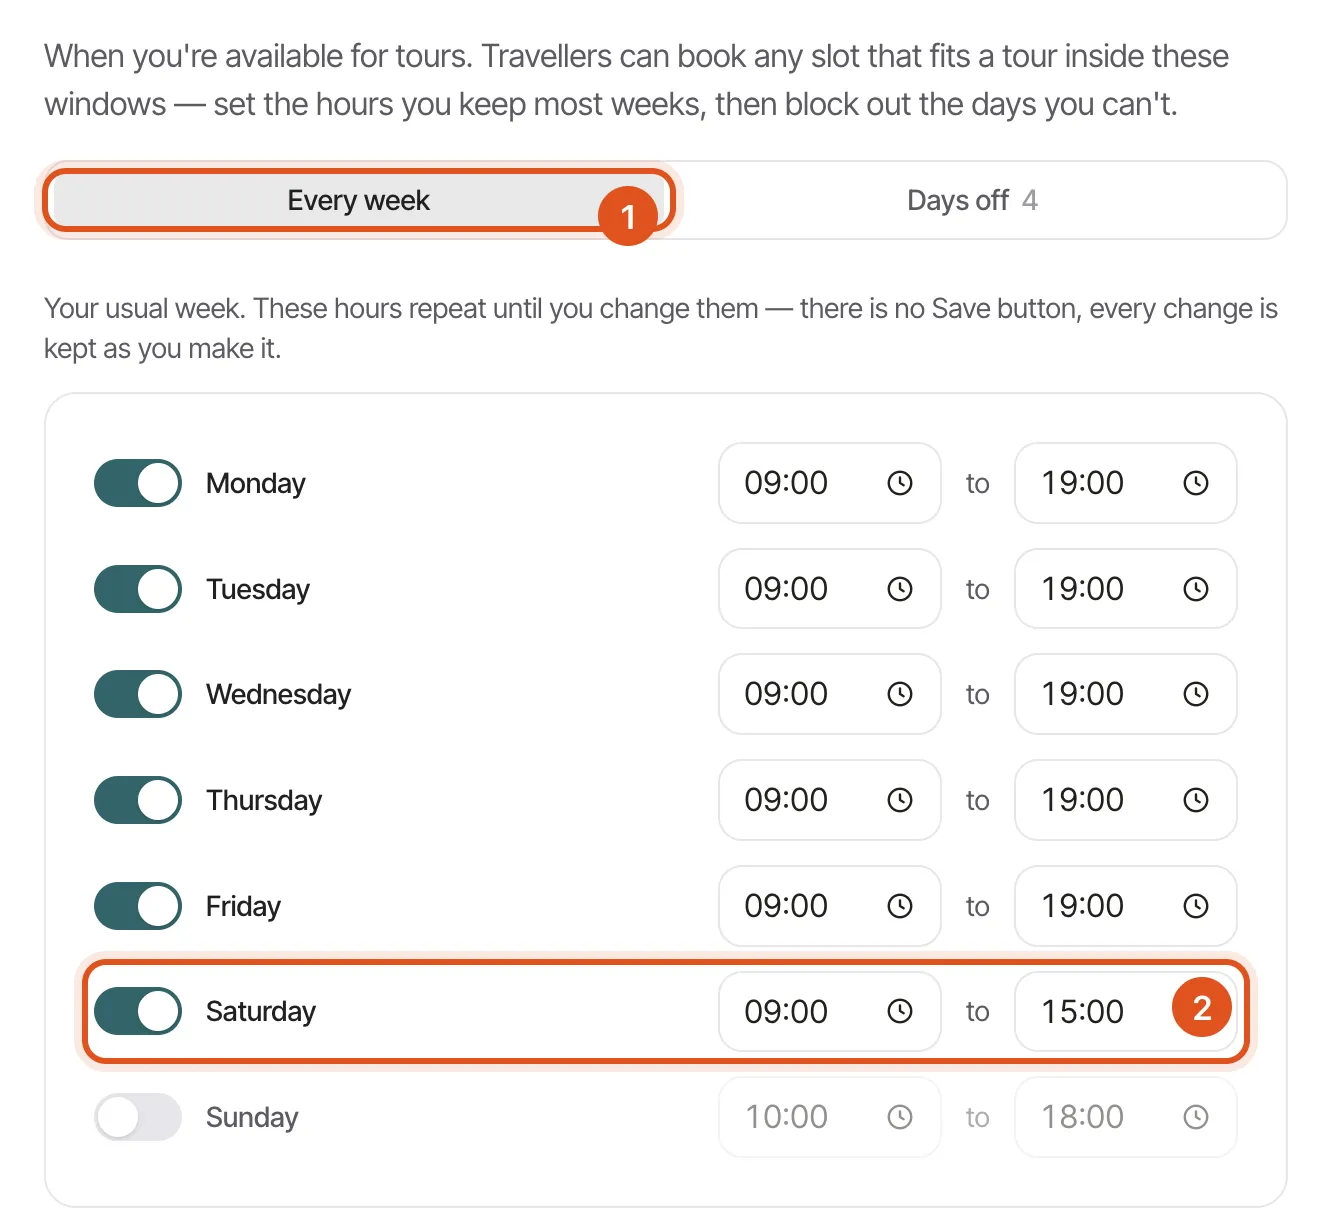
Remember signup gave you Mon–Sat 10:00–18:00. If you actually guide Thursday to Sunday, mornings only, this is the two-minute fix that stops you being offered for slots you'd never accept.
Days off and partial blocks
The exceptions tab. Block a whole date (holiday, wedding, a Tuesday you've earned) or just part of one — pick a from/to and only that window is blocked, leaving the rest of the day bookable. Handy for "I have a dentist appointment at 11 but I'm free after."
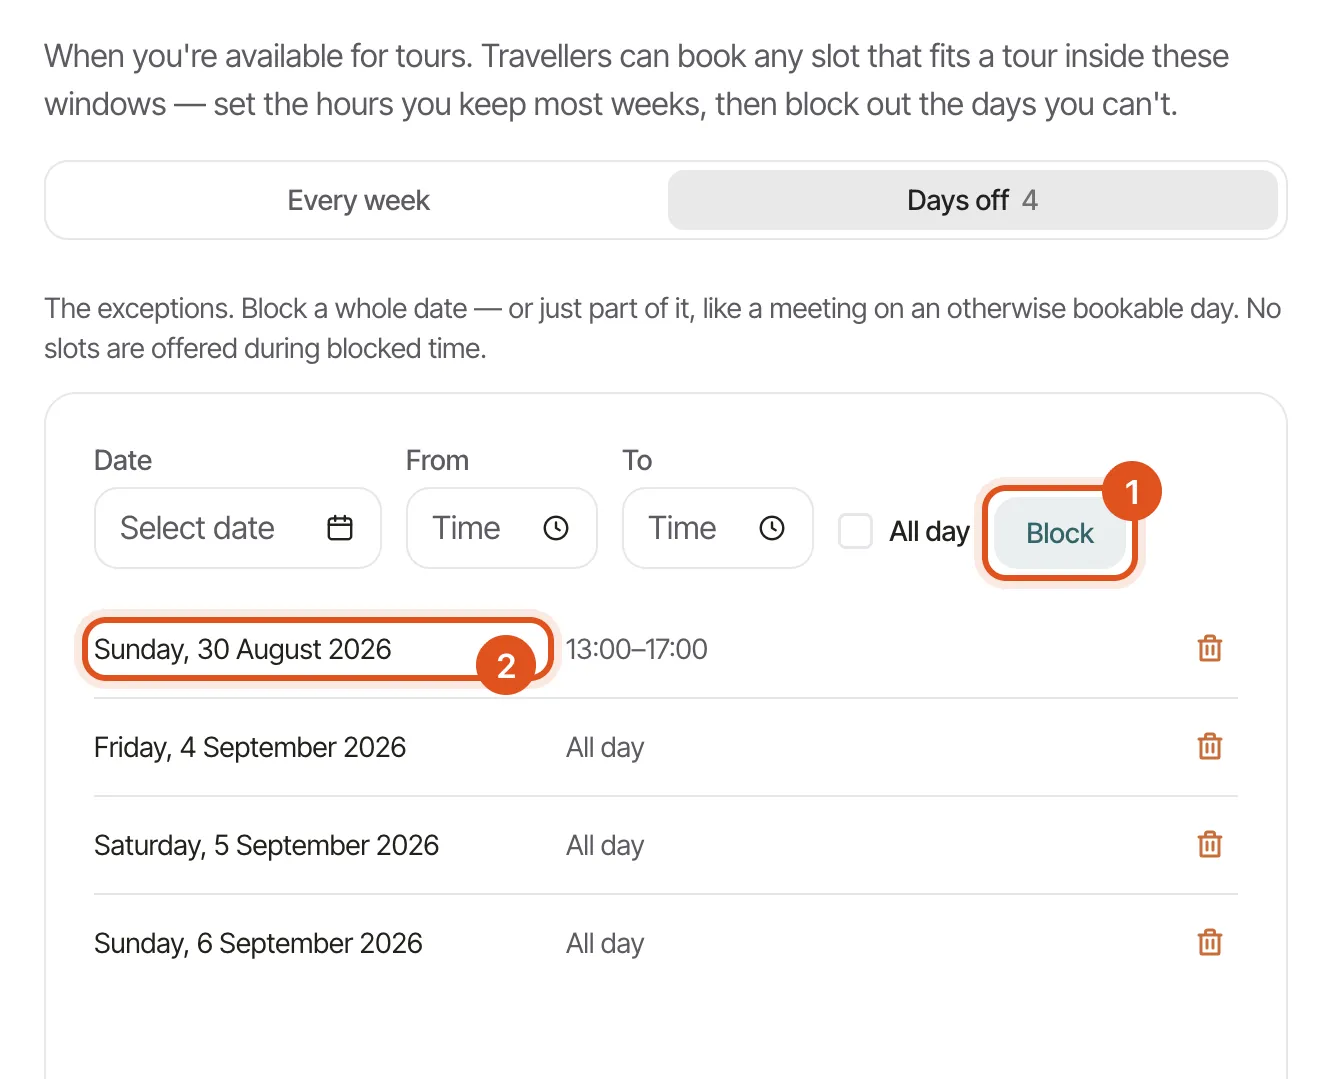
No slots are offered during blocked time, on any tour. Blocked dates are listed underneath with an unblock button, and only future ones are shown — past days off don't need managing.
Google Calendar
Calendar → Availability → Connect Google Calendar (or the sync dialog from the Calendar page). One OAuth click.
What it does, both directions:
- Out: every confirmed booking becomes an event in your Google Calendar. Public departures get one event per departure, with the roster in the description.
- In: anything already on your Google Calendar is treated as busy, so those slots stop being offered. This is what stops you being booked for a tour during your kid's school play.
Move or delete an event in Google and the app follows. Change a booking in the app and Google follows. The transitions are built so the two sides can't ping-pong — a change that came from the calendar is never written back to it. You will not wake up to 4,000 notifications. (We checked. Repeatedly.)
It's entirely optional. Everything works without it; you just have to remember your own dentist appointments.
The Calendar
The Calendar has two views, switchable top right, and your choice is remembered.
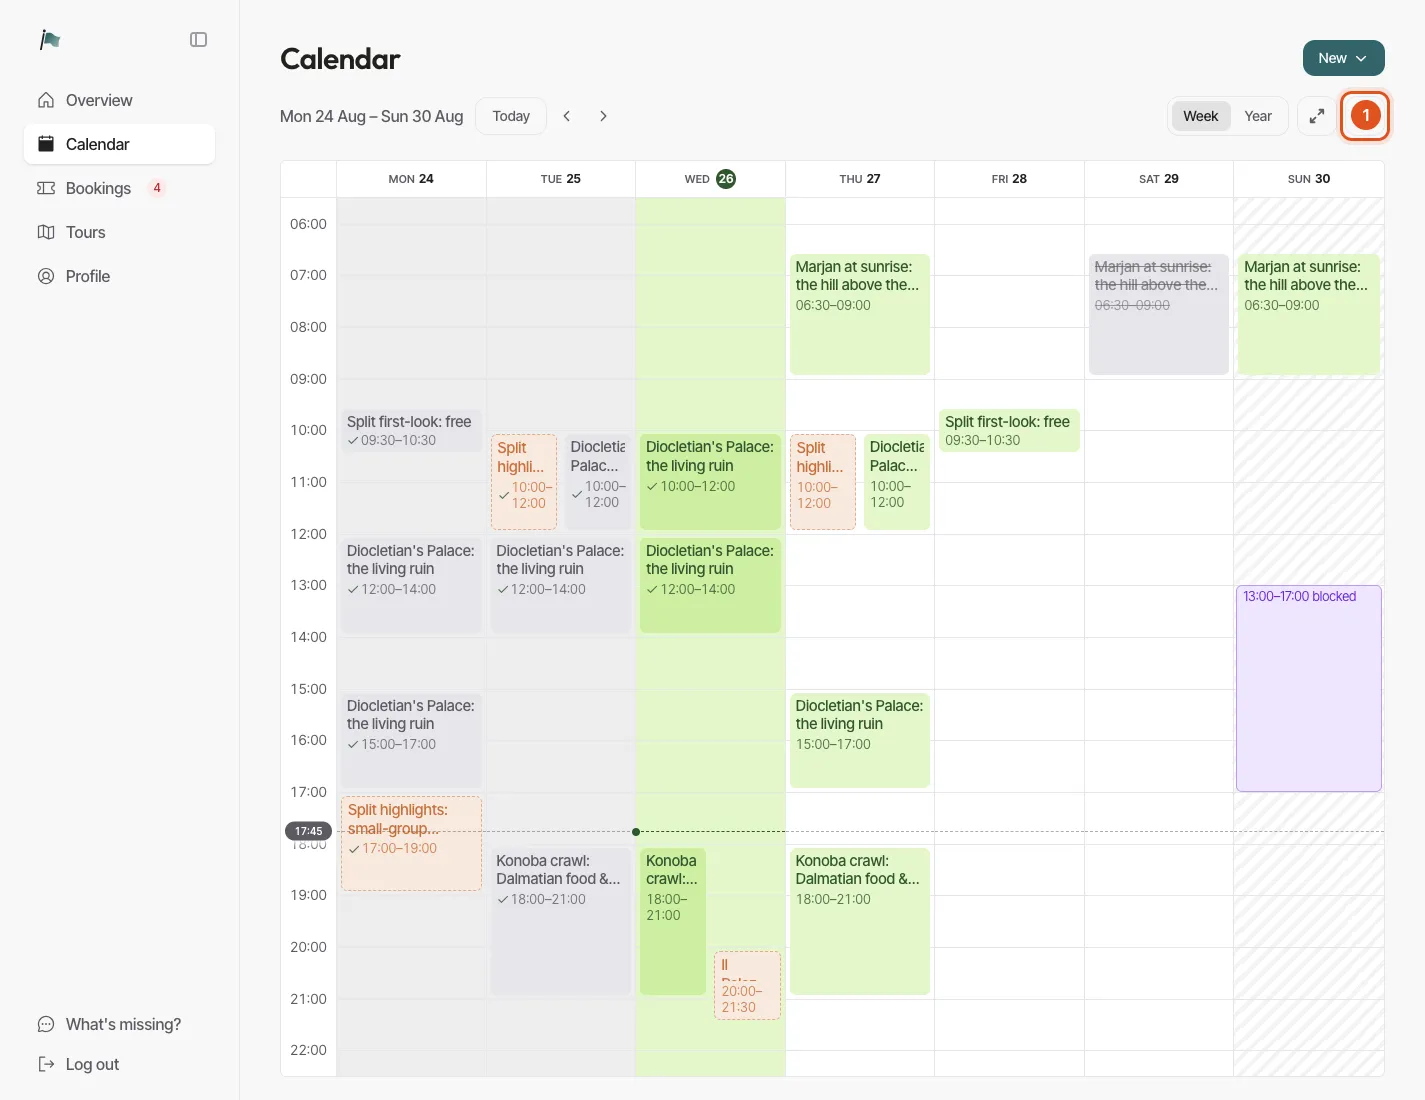
Week is the operational view — a grid of the week with everything on it.
Year is a rolling twelve months from today as one continuous scroll. It's for planning a season: where the gaps are, where you've quietly booked yourself solid, which month you've forgotten to open up.
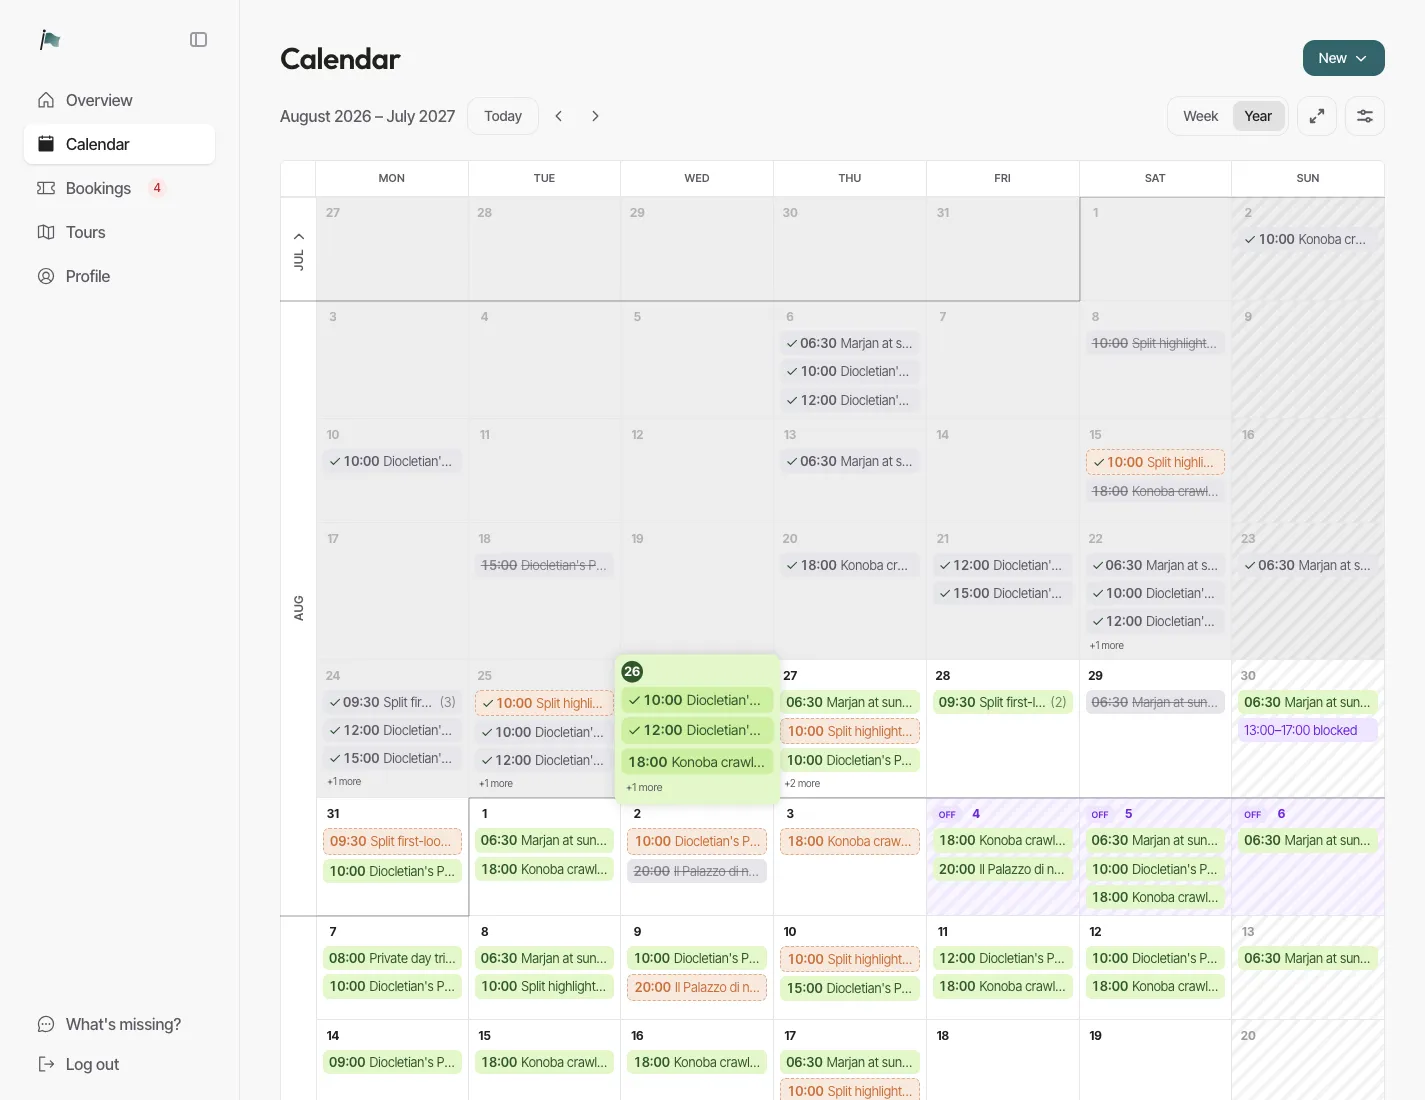
Click any day to add a booking on it. The New button gives you Booking or Departure — or, if you have no public tours yet, just a plain "New booking" button, because a menu with one item in it is worse than a button.
Bookings
The Bookings hub has five tabs: Active, Archived, Contacts, Reviews, Emails.
Private tour requests
A request arrives, you get an email, and it sits under Requests to review with a pending badge. That slot is held while it's pending — nobody else can take it — so this list is not a place to let things pile up.
Confirm and the traveller gets a confirmation email, the booking turns green, and it lands on your calendar. Decline and they get a polite note. Both are one click.
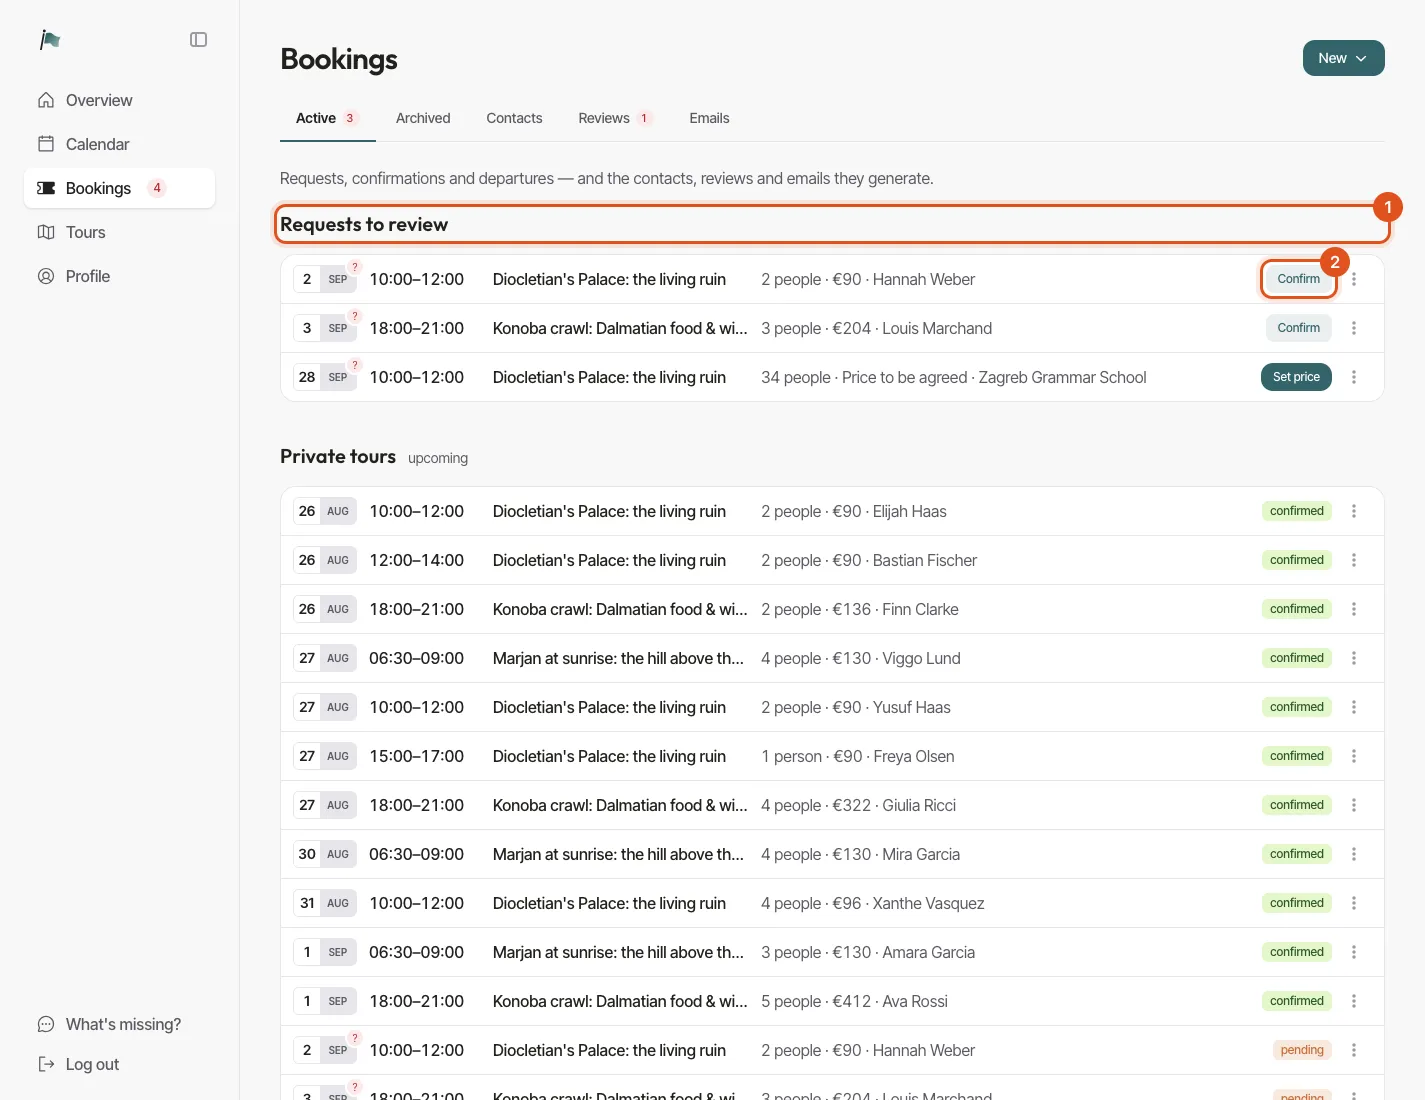
If you never answer, the app answers for you: a pending request auto-declines after three days, releasing the slot and sending the traveller a "this expired" email. It's not a punishment, it's plumbing — a slot held forever by a request you forgot is worse for everyone than a clean no.
Public departures
Bookings confirm instantly, so there's nothing to approve. A departure's detail page shows the roster and gives you:
- Cancel departure — everyone is emailed.
- Move / reschedule — everyone is emailed the new time.
- Confirm it anyway — waives the minimum for that departure (see above).
- Copy booking link — the direct link to that departure.
Adding a booking yourself
New → Booking. For the walk-up who paid cash, the phone booking, the friend of a friend. Pick the tour, the date and time, the traveller's details, and it's a normal confirmed booking from then on — calendar event, reminder, review request, all of it.
Hidden tours appear in this picker on purpose: "not on my public page" doesn't mean "not something I run."
Large-group enquiries
If a traveller's group is bigger than your max, they can't just book — they send an enquiry instead, which shows with an inquiry badge. These are priced by negotiation, off the platform, and they're deliberately excluded from all capacity maths: an enquiry holds no slot and blocks nobody. Settle the price by email or phone, put the agreed total in, and confirm.
Enquiries don't auto-expire the way pending requests do, because a school-trip negotiation routinely takes longer than three days.
One-off custom tours
Agreed a bespoke itinerary with someone — something you'll never run again? Create it as a one-off. It becomes a real, hidden, private tour behind the scenes so that every email, every calendar event and every "{{tourTitle}}" says the right thing, but it stays out of your reusable-tours list where it'd only be clutter. It's also never asked for a review, since a title like "Private tour for the Rossi family" isn't something you want published.
Rescheduling and cancelling
Both live in the ⋮ menu on any booking. Reschedule moves the date/time and emails the traveller the new details; cancel emails them too. Travellers can also cancel themselves, from a link in their own confirmation email — you get told, and the slot frees up automatically.
Archived
Past and settled bookings move out of Active so the list stays about what needs you. Nothing is deleted; it's all in the Archived tab.
Contacts
Contacts is built automatically from your confirmed bookings, deduplicated by email. Everyone who's ever booked you, in one list, with what they booked.
Add notes and tags to anyone — "prefers mornings", "walks slowly", "photographer", "repeat, third time". Notes are strictly yours; the traveller never sees them. Search by name or email.
This is the closest thing to a CRM you'll need, and it's the reason to keep bookings in one place: a year from now, "the Dutch couple who came in April" is findable.
Reviews
You don't have to chase these — the Reviews tab fills itself. When a tour ends, the app waits for the tour's end time to pass and then emails the traveller a review link. Once each, automatically.
What comes back:
- A review from an email that matches the booking publishes immediately. That's the normal case.
- A review from an email that doesn't match — a companion on someone else's booking, typically — waits under Awaiting your approval. Several people can review through one booking's link, once each, which is why this exists.
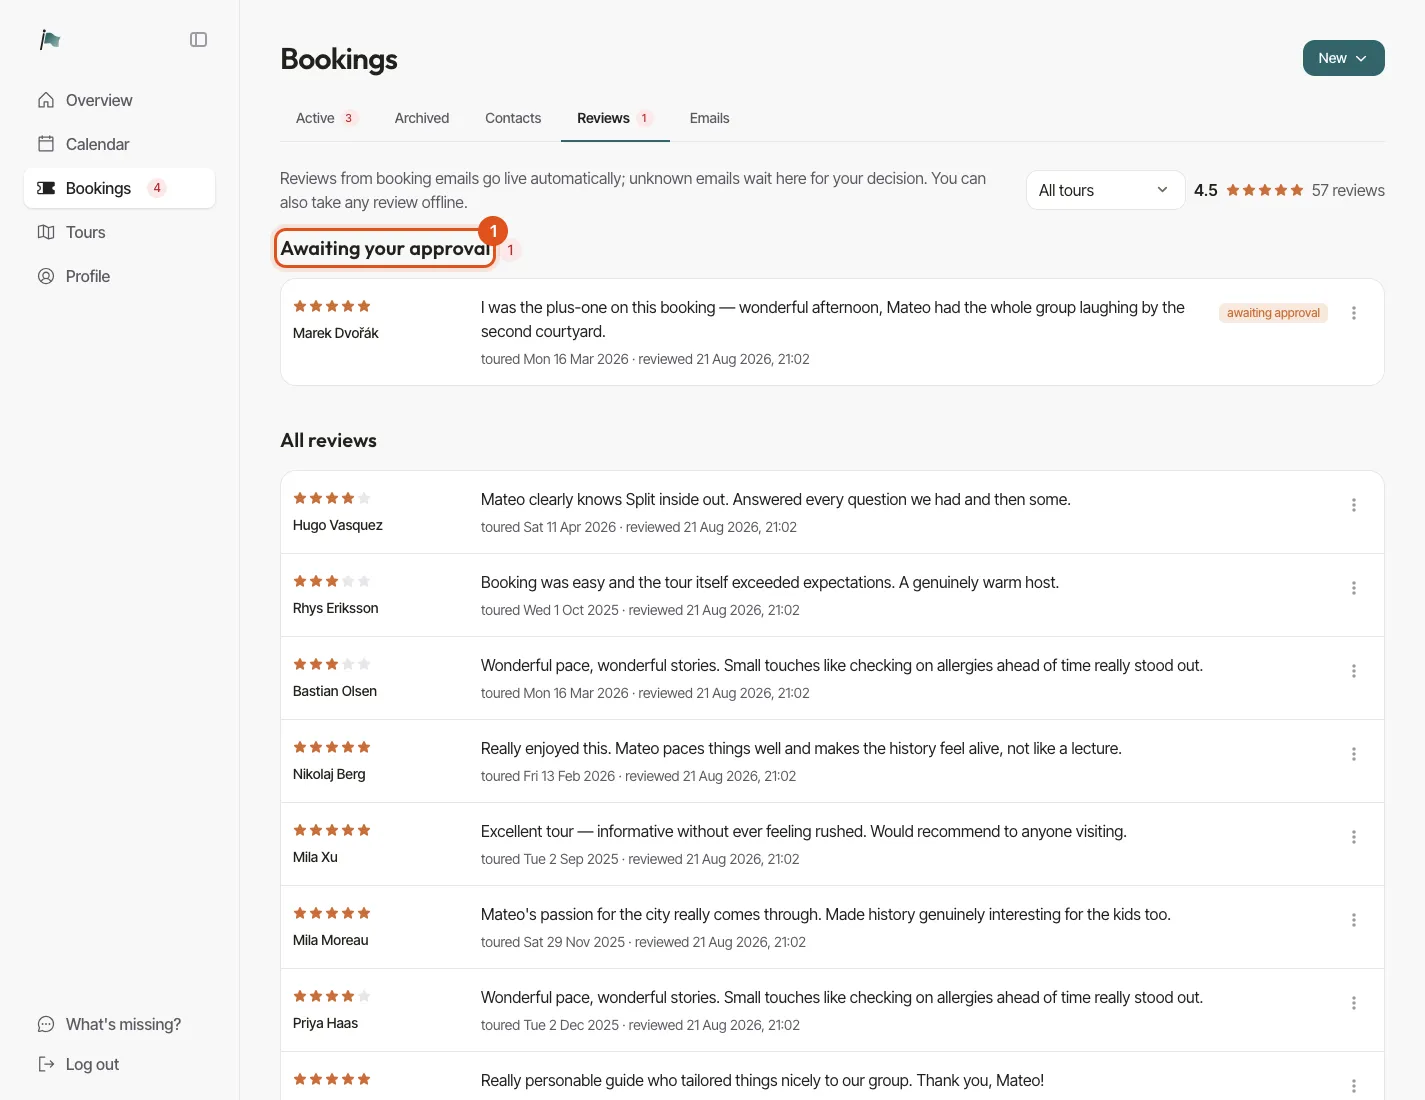
On any review you get Approve & publish, Decline, or Hide from my page. Hidden and declined reviews are kept, just not shown — nothing is destroyed, and a declined one can be published later if you change your mind.
Your average rating and review count show on your public page and on your Profile.
Emails
The app sends the emails your travellers get, and there's nothing for you to set up. Two things are still worth knowing: the log, and what happens when someone replies.
The log — Bookings → Emails
The email log holds every email the system has ever sent on your behalf: what was sent, to whom, when, the exact content, and whether the mail server accepted it. Open any one to read it exactly as the traveller got it. If something didn't land, you can resend it.
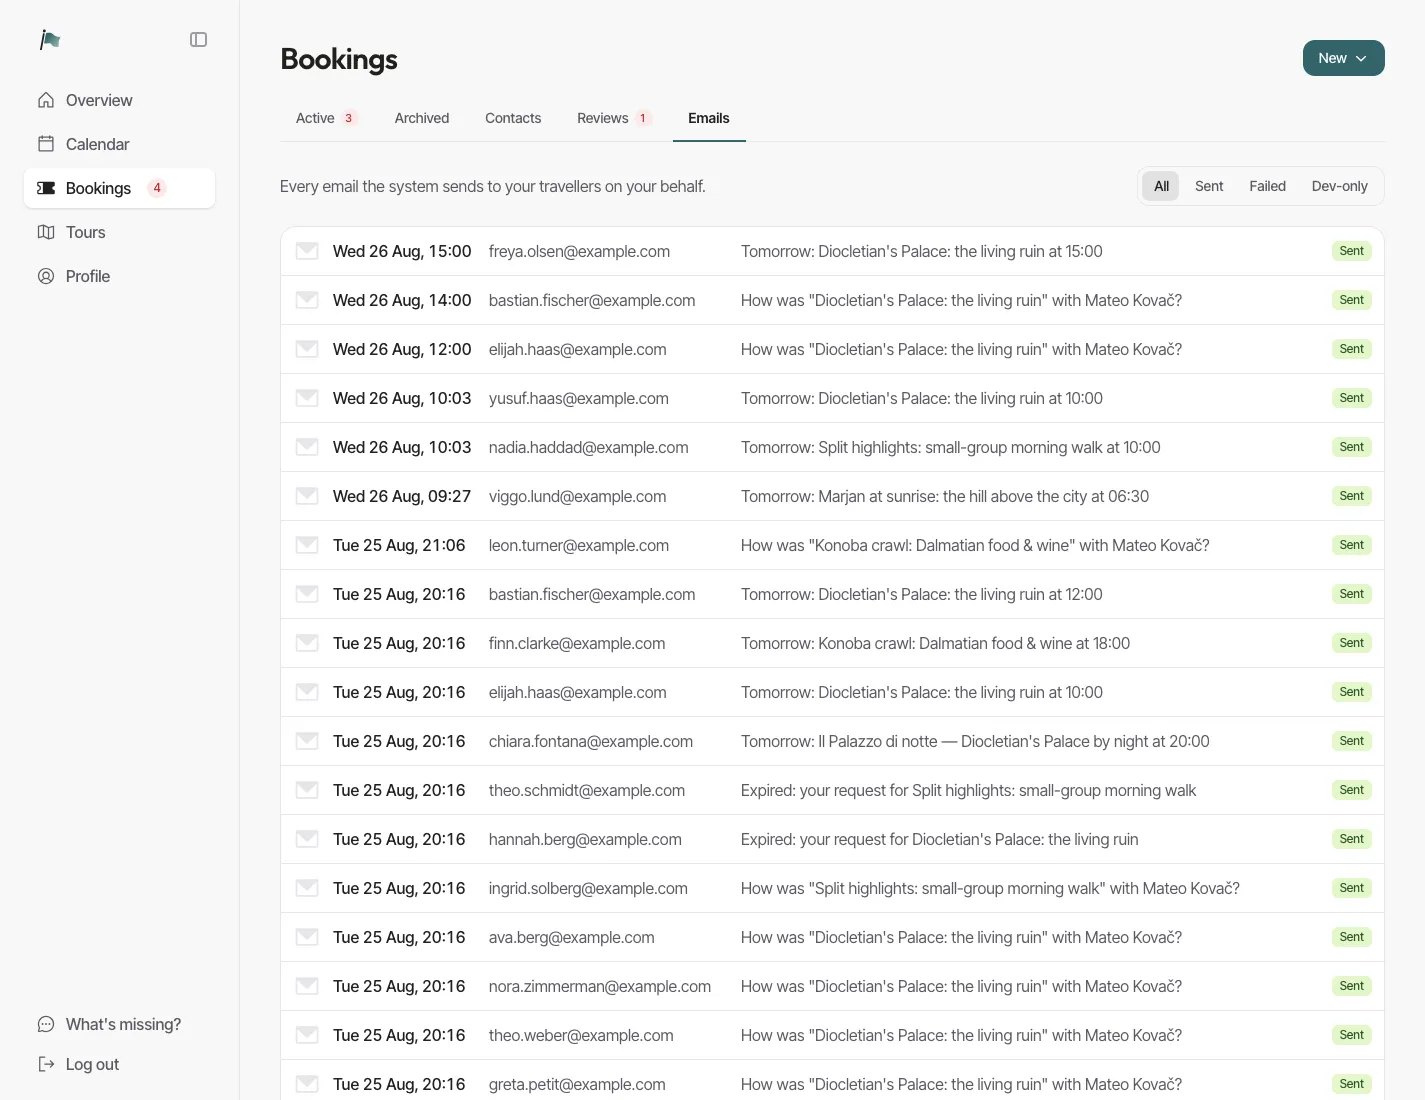
This is the first place to look when someone says "I never got a confirmation." Usually they did, and it's in Promotions.
The wording
The eleven emails a traveller can get, all automatic:
Request received · Booking confirmed · Group booking confirmed · Request declined · Booking cancelled · Booking rescheduled · Departure confirmed · Departure cancelled · Reminder · Request expired · Review request
You don't write them, and there's no screen to edit the wording — the text is the same for every guide. What's filled in per email comes straight from the booking (date, time, meeting point, price, the traveller's name), so it always matches what they actually booked.
That's on purpose: it's less to set up, and one less thing to check. If a stock email ever reads wrong to you, tell me.
Replies
When a traveller replies to a booking email, it reaches you — your real address is never exposed to them, and theirs isn't handed around either. Reply from your own inbox and it goes back to them. It just works like email, which is the entire point.
Sharing your page
Your direct link — allmytours.com/your-name. Copy it into your Instagram bio, your Google Business Profile, your email signature, your WhatsApp Business profile, and onto a small QR card you hand out at the end of a tour. One link, everywhere, and the QR card is the one people underestimate: a happy traveller at the end of a walk is the best-converting audience you will ever have.
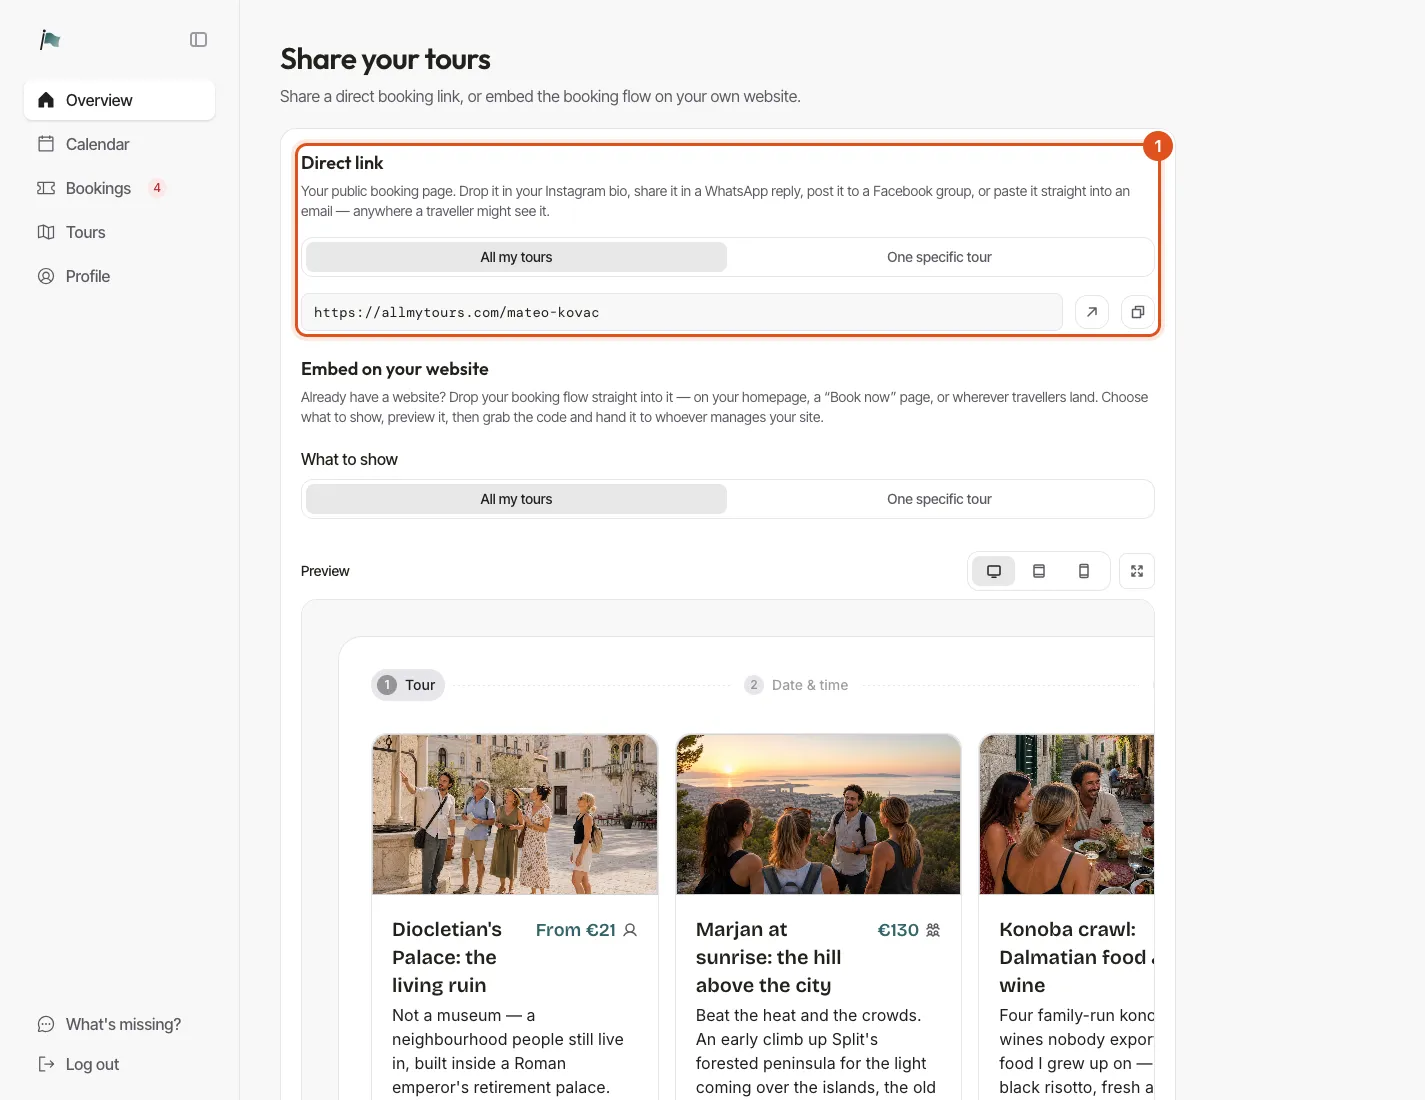
A link to one specific tour — pick a tour and copy a link that opens straight into it. For when you're posting about a particular walk rather than about yourself.
Embed on your own website — if you already have a site, drop the booking flow into it. Choose all my tours or one specific tour, preview it at desktop/tablet/mobile size, then copy the code. You get an iframe snippet and a script snippet for the cases where iframes are blocked. Hand either to whoever manages your site; it's a paste, not a project.
Common questions, answered properly
"My tour isn't showing on my page." In order of likelihood: the tour is Hidden rather than Live; bookings are paused on your Profile; or the tour is Live but has no bookable time — a private tour with "specific hours" enabled and no day switched on, or a public tour with no departure times.
"I have no available slots and I don't know why." Check, in this order: your weekly availability (signup's Mon–Sat 10–18 default is probably wrong for you), your days off, anything on a connected Google Calendar, your booking window (minimum notice can eat the next few days entirely), and the tour's cooldown.
"Why is a slot missing that should be free?" A pending request holds its slot. So does a cooldown either side of a nearby booking. So does a partial-day block.
"Can I run the same tour as both private and public group?" Yes — create it twice, once each way. They're separate tours with separate prices, which is usually what you wanted anyway, since a private version of a group tour is rarely the same price.
"What happens if nobody books a group departure?" Nothing, unless you set a minimum. With a minimum set, it auto-cancels at your cutoff and everyone is emailed.
"Do I need to add every tour before I go live?" No. One tour is a page. Add the others as you go; nothing about the setup gets harder later.
"Can I change prices later?" Yes, whenever. Existing bookings keep the price they were sold at — totals, tiers and add-ons are frozen onto each booking, so your history stays honest.
"Do travellers need an account?" No. Name and email, and they're done. That's most of why direct booking converts better than a marketplace.
Where to go next
Once your page exists, the work moves from setup to filling it. The booking page guide covers what belongs on the page itself; direct bookings for tour guides covers getting people to it without handing a third of your fee to a marketplace; the earnings calculator puts a number on what that third is actually worth to you over a year; and avoiding double bookings is worth ten minutes if you're still running a calendar and a booking list separately.
And if you get stuck on something this article didn't cover, tell me — that's usually a sign the app should have been clearer, not that you missed something.
Frequently asked questions
How long does it take to set up a guide page?
About twenty minutes for a page you'd happily send to a traveller: five for the profile, ten for your first tour, and a couple to set your weekly hours. Everything else — calendar sync, add-ons, tour-specific hours — is optional and can be added later without redoing anything.
Does All my tours take payment from travellers?
No. The app handles the booking — availability, confirmation, emails, reminders — but money stays between you and the traveller. You take payment however you already do: cash on the day, a bank transfer, a payment link, whatever you prefer. Nothing is deducted from your fee and there's no commission.
Can I change my page address later?
Yes. Change it on the Profile page and your old address keeps working — it redirects to the new one forever, so printed cards and old Instagram links don't break. Your old address is also locked so nobody else can ever claim it.
What's the difference between a private tour and a public group tour?
A private tour is requested: a traveller picks a free slot, you approve it, and that slot then belongs to them alone. A public group tour runs on a fixed schedule you set, strangers join the same departure, and bookings confirm instantly with no approval step from you.
How do I share my booking page?
Copy the link from Overview → Share (or the "Open public page" button on your Profile) and put it in your Instagram bio, your Google Business Profile, your email signature and on a QR card. You can also copy a link that opens one specific tour, or embed the whole booking flow on your own website.
Can I pause bookings while I'm away?
Yes — Profile → Booking status → Pause bookings. Your page stays online with a clear "not currently accepting bookings" notice, and every booking you've already taken carries on exactly as before. Resume in one click when you're back.